Pre-visualization
It has been said that "from the moment a script exists and work commences, the director should strive to make every shot and every sequence count" (Katz, 1991:6). This has also been said to be true for every element of the film - each character, prop, line of dialogue, every detail within the world of the film - as the director is responsible for making decisions about every element which will appear on screen, and should be able to justify what each contributes to the story (Rea & Irving, 2015:56). This is because "a story takes place in time and space", hence, through their decisions, the director determines this time and space (Rea & Irving, 2015:56), which affects how the story will be told to the audience.
A director can plan their decisions by breaking down the script using a process known as "pre-visualization" (Rea & Irving, 2015:56). This process is essential so that the director is able to see their ideas as visuals before filming (Katz, 1991:5).
Visualization has been considered as a combination between immediacy - as the director develops the shots they wish to film, and the order they will be shown within a sequence, analysing, comparing and refining these ideas - and reflection - as it is recommended that the director takes some time between drafts of their ideas to allow them to come back and refine these with a fresh perspective (Katz, 1991:5). Due to this combination of immediacy and reflection, the director should begin working to visualize the script "with an alertness to visual possibilities", which allows them to explore many ideas (Katz, 1991:5). The director should remember that "there is no such thing as a mistake in visualization, only alternative ideas", and that the exploration of many ideas is important as it "ultimately leads to discovery" (Katz, 1991:5).
The director should therefore use this process of pre-visualization to help them discover their vision for the film and develop ideas for how to bring this to life on screen (Rea & Irving, 2015:54). Nonetheless, the director needs to be flexible in regard to their plan, and know the script well, so that if changes need to be made for logistical reasons during production, or if there is a suggestion from either the cast or crew, the director can embrace this change, whilst still ensuring that it fits and serves their vision (Rea & Irving, 2015:54-6).
For example, when the director has developed a pre-visualization plan, and has a clear idea of their decisions for shots, they will discuss these with the film's director of photography, art director, and production manager to see if these choices are possible (Rea & Irving, 2015:57). This is because these decisions affect the work of the rest of the crew, since different shots might need different equipment, or extra crew or cast members, among other logistics (Rea & Irving, 2015:57). During this meeting, the director's decisions may hence need to be adjusted due to any production limitations, such as those of the schedule or budget (Rea & Irving, 2015:57).
Despite this collaboration, the director should not stop being responsible for ensuring that every shot and sequence effectively contributes to the telling of the story, since the rest of the crew "do their best work when the director is contributing and setting high standards for design" (Katz, 1991:6).
To begin this process of pre-visualization, a director may begin by creating a shooting script and overhead diagrams in conjunction with each other, leading to being able to mark where the cameras will be positioned on the overhead diagrams (Rabiger & Hurbis-Cherrier, 2013:305-6). Since these then "contain most of the information you need to determine shooting order" (Rabiger & Hurbis-Cherrier, 2013:306), the director can then turn this into a shot list (Rea & Irving, 2015:56). A director may also use storyboards to visualize the film, typically most important for when a sequence could be complex, such as those which involve a lot of action, or will be cut together into a montage (Rea & Irving, 2015:62).
Yet, it is also important that the director has done a script analysis before beginning to visualize the script, since "every creative decision flows from a profound understanding and interpretation of the script and a clear sense of its theme or central idea" (Rea & Irving, 2015:57). This can help the director to determine what coverage they wish to film, by thinking about how they can present their understanding and interpretation visually (Rea & Irving, 2015:60).
After working on my own script analysis, I began pre-visualization by working on developing an overhead diagram to give me a clear idea of the space we would be filming in.
Virtual location recce
Typically, the director visits possible filming locations with the director of photography and production designer, along with the sound recordist if dialogue is to be recorded at the location in order to assess whether the location works for the film in terms of look, access, logistics and sound (Rabiger & Hurbis-Cherrier, 2013:289-90). We had planned to film in the breakfast room at Bradbourne House, however, since I was unable to attend our location recce, and was also unable to visit at a later date before filming due to lockdown restrictions, I had to find a different way to do a location recce. Jess and Aurelija took pictures and videos for me to look at, which were helpful since they allowed me to see how the location looked in comparison to the pictures I had seen online, because this was slightly different. Yet, I also found a way to do a virtual location recce by going on the location's website and using the 3D tour feature on their homepage.
Using this and the location recce photos, I was able to create an overhead diagram.
Using this and the location recce photos, I was able to create an overhead diagram.

Fig. 1 Photos from the location recce (2020)

Fig. 2 Bradbourne House 3D tour feature (2020)

I also wanted to figure out compass points for the space, since we had planned to use some natural light, and the room does have quite a lot of windows which would potentially be in the shots. To do this, I used the floor plan from the 3D feature on the website (see fig. 4) and worked out how this would match up with the exterior of the location on google maps (see fig. 3), using windows and the shape of the building as a guide.

Even though the 3D feature on the location's website allowed me to move around the room, there were only limited points which I could move to. This made some angles and perspectives hard to determine, so I found it hard to judge how big or small the room really was. It was also hard to judge how much room the table which I plan to place in the centre of the room for Monica to write at would take up.
Yet, overall the 3D feature did help me when planning my shots, since, for example, I wanted to frame Monica in one of the door frames of the breakfast room, and I was able to use the 3D feature to take a screenshot of this angle, which I could then use as a reference when drawing the storyboard.


Fig. 3 Bradbourne House exterior (2020)
Fig. 4 Bradbourne House interior floor plan (2020)
A disadvantage of not going to the location was that I found it difficult to tell if shots in front of the windows could be overexposed, however, this is something I could discuss with the cinematographer of the project, Aurelija, since she did go to the location recce, which could allow us to adjust any shots as necessary closer to filming.Even though the 3D feature on the location's website allowed me to move around the room, there were only limited points which I could move to. This made some angles and perspectives hard to determine, so I found it hard to judge how big or small the room really was. It was also hard to judge how much room the table which I plan to place in the centre of the room for Monica to write at would take up.
Yet, overall the 3D feature did help me when planning my shots, since, for example, I wanted to frame Monica in one of the door frames of the breakfast room, and I was able to use the 3D feature to take a screenshot of this angle, which I could then use as a reference when drawing the storyboard.

Camera plans

Fig. 5 Example camera plan (2013)
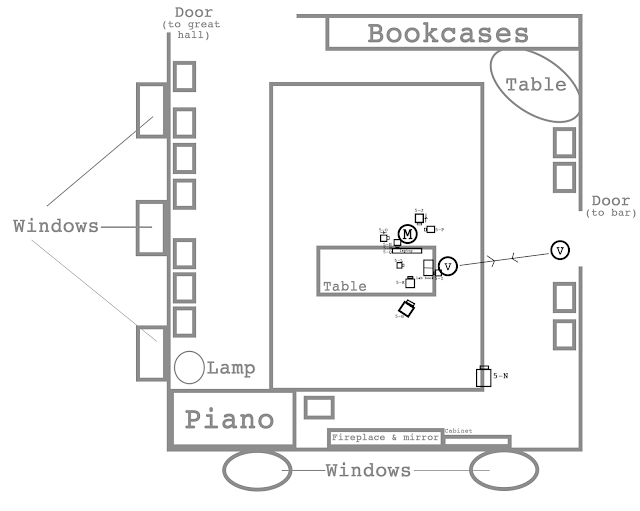
Since an overhead diagram is "a bird's eye view of the space in which you will be shooting your scene", they can be used to mark the positions and movement of the cameras and actors (Rea & Irving, 2015:61). On these camera plans the cameras are typically "indicated by small 'v's, and the direction they are pointing (with indicated camera moves) allows the director and all department heads to know where the camera will be positioned" (Rea & Irving, 2015:61) - (see fig. 5).
Despite this, I decided not to mark the cameras with v's when drawing mine, but instead used squares, as I have drawn my overhead diagrams like this when working on other films throughout the course, and I find that marking the cameras as two squares makes it easier for me to glance at the diagram quickly and understand what that camera position would indicate about the screen direction of each frame.
This is especially useful to me because I have found that I sometimes confuse screen direction. For example, when drawing my storyboards in conjunction with developing camera plans, I planned to have a continuous shot in the first scene, with one angle of this shot showing a two shot of Monica and her laptop. I drew Monica on the left and the laptop on the right in the storyboard and marked where the camera would be for this on the overhead diagram. However, I later realised that this angle would mean Monica would be in the right of the frame, not on the left.
Due to how visualisation is about experimenting with many ideas I did decide to first draw up overhead diagrams in pencil, and then later re-draft these digitally, which allowed me to further refine my ideas and correct the mentioned mistake in screen direction, as I drafted the camera plans until I felt like I had discovered what coverage I wanted, and could use the plans when directing on set.
 Nonetheless, the disadvantage of using squares to mark the cameras was that I didn't feel like I had room to neatly annotate each camera position with what the camera angle would be, such as "Angle 1: Master" (Rabiger & Hurbis-Cherrier, 2013:305). Instead, I marked each camera position with the letters from the shooting script, as also seen in the example camera plan above, so that each camera position still had an annotation such as "14-C" - the number indicates the scene number from the shooting script, and the letter designates the order the shots appear in the sequence according to the shooting script (Rabiger & Hurbis-Cherrier, 2013:306). I found that this created a cohesion across the shooting script, storyboards and overhead diagrams, which can be carried over to the shot list.
However, this number and letter don't include much information about the shot, so the shot size and subject will therefore need to be written somewhere else on or next to each overhead diagram, especially when I need to refer to these during filming.


 Camera plans like these are normally developed by the director from rehearsals with actors during which blocking is refined, as well as "adjusted by the realities of the location" (Rea & Irving, 2015:61). Therefore, these plans might change once I visit the location, as well as work to block the scenes with actors.
However, I found that these plans still helped me to plan the kind of coverage I wanted and determine my aims for directing the film. I can also use these camera plans when making my shot list, as by marking out where the cameras could be positioned the director is able to "prioritize her shot list, leaving extra shots...until the end" (Rea & Irving, 2015:61).
Despite this, I decided not to mark the cameras with v's when drawing mine, but instead used squares, as I have drawn my overhead diagrams like this when working on other films throughout the course, and I find that marking the cameras as two squares makes it easier for me to glance at the diagram quickly and understand what that camera position would indicate about the screen direction of each frame.
This is especially useful to me because I have found that I sometimes confuse screen direction. For example, when drawing my storyboards in conjunction with developing camera plans, I planned to have a continuous shot in the first scene, with one angle of this shot showing a two shot of Monica and her laptop. I drew Monica on the left and the laptop on the right in the storyboard and marked where the camera would be for this on the overhead diagram. However, I later realised that this angle would mean Monica would be in the right of the frame, not on the left.
Due to how visualisation is about experimenting with many ideas I did decide to first draw up overhead diagrams in pencil, and then later re-draft these digitally, which allowed me to further refine my ideas and correct the mentioned mistake in screen direction, as I drafted the camera plans until I felt like I had discovered what coverage I wanted, and could use the plans when directing on set.

However, this number and letter don't include much information about the shot, so the shot size and subject will therefore need to be written somewhere else on or next to each overhead diagram, especially when I need to refer to these during filming.
Scene 1

- 1-A: Continuous take - medium shot to two shot to medium shot of Monica typing on her laptop at the table
Scene 2

- 2-A: Angle on line of champagne flutes (slightly high angle), tilts up to see writer #1, follows them as they walk around the table in medium shot
- 2-B: Wide shot (slightly high angle)
- 2-C: Medium shot Monica - other party-goers can be seen at edge of frame
- 2-D: Medium shot of Monica pushes in so other party-goers can no longer be seen
Scene 3

- 3-A: Full shot of books
- 3-B: Close-up Monica (slightly profile)
- 3-C: Monica's POV - blank page & blinking cursor on laptop screen
- 3-D: Profile wide shot framed by doorway
- 3-E: Medium Monica
- 3-F: Insert - phone alarm notification
- 3-G: Slow push-in - from medium shot Monica to CU
- 3-H: CU of keyboard & Monica's hands
Scene 4

- 4-A: Close-up Monica
- 4-B: Wide shot - profile
- 4-C: CU profile - Monica in foreground, writer #1 in background
- 4-D: Wide shot
- 4-E: CU champagne
Scene 5

- 5-A: Wide shot (same shot as 4-D)
- 5-B: CU Monica
- 5-C: Monica's POV - laptop screen
- 5-D: Wide shot
- 5-E: Monica MCU
- 5-F: Vera MCU
- 5-G: Medium shot Monica - pans to become two shot

- 5-G: Two shot
- 5-H: CU keyboard - pan as Monica's hands dash across keyboard
- 5-I: CU - tilt and pan over Vera's papers and lab book as she writes
- 5-J: CU laptop screen full of text - pulls out to see back of Monica
- 5-K: Monica MCU
- 5-L: Medium shot Vera
- 5-M: Monica's POV - laptop screen
- 5-N: Wide shot
- 5-O: Medium 3/4 Vera leaving
- 5-P: CU Monica
- 5-Q: CU backspace key

- 5-R: Wide - shot pans as Vera moves to sit down next to Vera
- 5-S: Medium shot (slightly angled)
- 5-T: Monica MCU
Scene 6

- 6-A: Wide shot
- 6-B: Medium shot - follows Monica, tilts down to show Vera
- 6-C: Insert - phone screen clock
- 6-D: Handheld MCU - follows Monica as she paces
- 6-E: Follows Monica
- 6-F: Monica MCU
- 6-G: Wide shot - laptop close-up in foreground - tilts to become low angle shot as Monica opens laptop lid
- 6-H: Vera medium shot
- 6-I: Monica CU
- 6-J: Wide two shot - Monica and laptop

- 6-K: Monica medium - pushes in slightly and pans around in half circle
- 6-L: Half-circle - tilts up to see Vera watching
- 6-M: Vera medium
- 6-N: CU keyboard
- 6-O: Another circle - framing is closer and tighter
- 6-P: Another circle - framing is as close and tight as possible
- 6-Q: Insert - laptop screen
- 6-R: Wide
- 6-S: Vera medium (same as 6-M)
- 6-T: Monica medium
- 6-U: Wide - empty room
Scene 7

- 7-A: CU closed laptop as Monica places it on the table
- 7-B: Wide profile shot
Scene 8

- 8-A: Medium shot Monica - other party-goers can be seen at edge of frame
- 8-B: Wide shot - laptop close in foreground
- 8-C: Wide high angle shot
- 8-D: Monica MCU
- 8-E: Insert - blank page & blinking cursor on laptop screen
- 8-F: Full shot - tracks out for the end of the film
However, I found that these plans still helped me to plan the kind of coverage I wanted and determine my aims for directing the film. I can also use these camera plans when making my shot list, as by marking out where the cameras could be positioned the director is able to "prioritize her shot list, leaving extra shots...until the end" (Rea & Irving, 2015:61).
Shot list

Fig. 6 Example shot list (2020)
A shot list is a document which lists every planned shot, almost like a checklist (Maio, 2020). Thus, every shot is covered, even if several of these shots can be achieved in the same setup - that is, even if the camera remains in one place but films several different shots (Rea & Irving, 2015:62). Each of these shots would still be listed on the shot list separately (Rea & Irving, 2015:62). The director usually makes this list, collaborating with the director of photography and first assistant director (Maio, 2020).
When making a shot list, a director should consider the order they list the shots in, since wide shots, for example, have been said to "set performance levels, take most lighting resources, and set lighting patterns", and therefore take the most time to set up (Rabiger & Hurbis-Cherrier, 2013:306-7). Due to this, it is suggested that wide shots be filmed first, since any shots of a closer shot size which are then filmed will also have to match the wide shot (Rabiger & Hurbis-Cherrier, 2013:307). Close-ups are thus typically shot next, along with over-the-shoulder shots, leaving "reaction shots, inserts, and cutaways" as the last shots to be filmed (Rabiger & Hurbis-Cherrier, 2013:307). This is because inserts and cutaways can often be filmed when the actors are not on set (Rabiger & Hurbis-Cherrier, 2013:307).
Recording which shots are needed in a list like this can help the director remember what they want to achieve, as well as help them see what resources will be needed (Maio, 2020). This is because the shot list can also include information about the location of the scene, camera movement, and a description of the scene (see fig. 6). Considering this example, I made my own shot list, also including the letter of each shot, since this acts as a quick reference to each shot's planned order in the sequence from the storyboards, overhead diagrams, and shooting script.


 This shot list may also change closer to filming, since I decided to list the scenes in order, rather than list them in the order which they would be scheduled to be filmed in. Yet, since shot lists include information about the amount of shots the director wishes to film, as well as the type of shots, and the resources needed to film these, they are often used to help work out the schedule and budget (Maio, 2020). However, the producer also needs information such as what props, costumes, and extras are needed before they can finalise the schedule and budget - such what order scenes will be filming in - which are outlined in the script breakdown (Rea & Irving, 2015:54). For this reason, I created my script breakdown at the same time as my shot list, which could then help me produce the final schedule and budget for the film once we get closer to filming.
It has been argued that pre-visualization "is only completed when the filmmaker has created something he can use" (Katz, 1991:6). Despite this, pre-visualization is only one stage of the production process, as a film cannot be made on paper (Katz, 1991:6). It is likely that the plan created during this stage will change in some way once production begins (Katz, 1991:6). Since a director uses pre-visualization to explore ideas, it can thus be suggested that the purpose of pre-visualization can be considered as not aiming to cut down the amount of decisions made on set, or to make production run quicker, but to preview ideas on paper, so that if they are improved by changes in production, then the pre-visualization plan acted to "focus the vision in the final film" (Katz, 1991:6).
List of Illustrations
Figure 1. Fairhall, J. & Klydziaite, A. (2020) Photos from the location recce. [Photographs] In possession of: the author.
Figure 2. Bradbourne House 3D tour feature (2020) [Screenshot] At: https://bradbournehousekent.co.uk (Accessed on 15 May 2020).
Figure. 3 Bradbourne House exterior (2020) [Google maps, screenshot] At: https://www.google.com/maps/place/Bradbourne+House/@51.2948718,0.4419034,41m/data=!3m1!1e3!4m5!3m4!1s0x47df345d218ab9fd:0x9abc7c30301df51e!8m2!3d51.295001!4d0.441727 (Accessed on 15 May 2020).
Figure. 4 Bradbourne House interior floor plan (2020) [Screenshot] At: https://bradbournehousekent.co.uk (Accessed on 15 May 2020).
Figure 5. Rabiger, M. & Hurbis-Cherrier, M. (2013) Example camera plan. [Diagram] In: Rabiger, M. & Hurbis-Cherrier, M. (2013) Directing: Film Techniques and Aesthetics. (5th ed.) Oxon: Focal Press. p.305.
Figure 6. Example shot list (2020) [Diagram] At: https://www.studiobinder.com/blog/what-is-a-shot-list-example/ (Accessed on 25 May 2020).
Figure 6. Example shot list (2020) [Diagram] At: https://www.studiobinder.com/blog/what-is-a-shot-list-example/ (Accessed on 25 May 2020).
References
Katz, S. (1991) Film Directing: Shot by Shot. California: Michael Wiese Productions.
Maio, A. (2020) 'What is a Shot List? Examples and a Brief Definition.' In: StudioBinder 5/2/20. At: https://www.studiobinder.com/blog/what-is-a-shot-list-example/ (Accessed on 25 May 2020).
Rabiger, M. & Hurbis-Cherrier, M. (2013) Directing: Film Techniques and Aesthetics. (5th ed.) Oxon: Focal Press.
Rea, P. & Irving, D. (2015) Producing and Directing the Short Film and Video. (5th ed.) Oxon: Focal Press.
Comments
Post a Comment